怎样用 PSAD 摆脱服务器端口被扫描
原创 张 林海

互联网上有很多无聊的人会全天候的扫描各种端口,本教程将帮助您花 10 分钟用 PSAD 来彻底封杀他们。
本文的运行环境为 Ubuntu 20.04 LTS,其他 Linux 也类似。
在安装之前,需要设置好你的防火墙,只开放必要的端口,比如(网页服务80,ftp21),剩下的端口封闭并记录到系统记录。
安装
先来安装 PSAD
sudo apt-get install psad
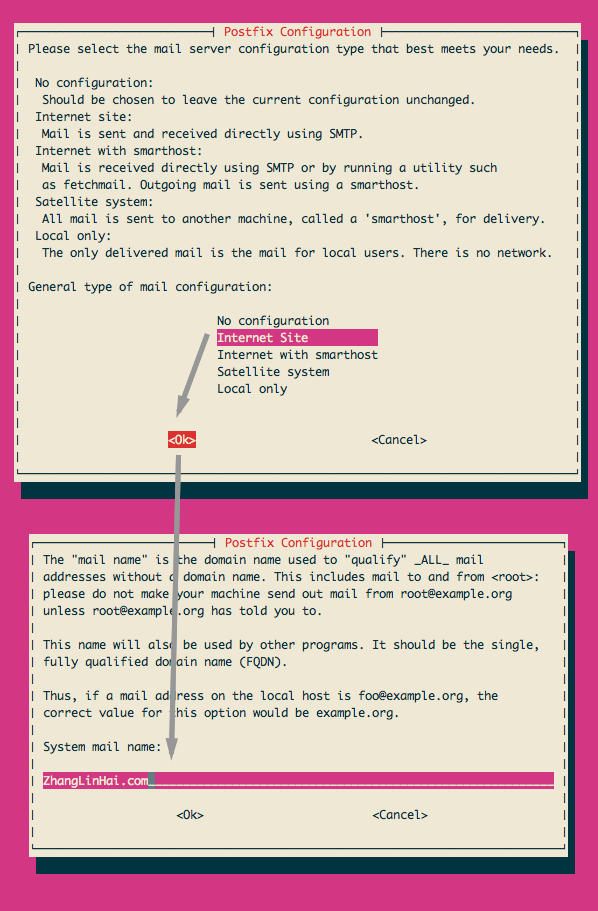
安装过程中可能会提示你需要先安装 Postfix,在 Postfix Configuration 中选择第二项“Internet Site”,然后输入主机名,以后发信均会用这个名字。确认后将会继续安装 PSAD。
备份并修改配置文件
$ sudo cp /etc/psad/psad.conf /etc/psad/psad.conf-orig
$ sudo vi /etc/psad/psad.conf
配置
修改邮箱和主机名
- EMAIL_ADDRESSES 是警报要发送给哪个邮箱
- HOSTNAME 定义本机域名
EMAIL_ADDRESSES             username@yourhost.com;
HOSTNAME                    yourhost.com;
定义危险级别
PSAD 根据网络数据包,来定义危险级别,你可以根据需求自定义这些数值。
	### Danger levels.  These represent the total number of
	### packets required for a scan to reach each danger level.
	### A scan may also reach a danger level if the scan trips
	### a signature or if the scanning ip is listed in
	### auto_ips so a danger level is automatically
	### assigned.
	DANGER_LEVEL1               5;    ### Number of packets.
	DANGER_LEVEL2               15;
	DANGER_LEVEL3               150;
	DANGER_LEVEL4               1500;
	DANGER_LEVEL5               10000;
敏感度
报警阀值:黑客会扫描很多端口,当超过 x 个端口时就触发警报。比如超过 1 个端口时报警。
	### Set the minimum range of ports that must be scanned before
	### psad will send an alert.  The default is 1 so that at
	### least two port must be scanned (p2-p1 >= 1).  This can be set
	### to 0 if you want psad to be extra paranoid, or 30000 if not.
	PORT_RANGE_SCAN_THRESHOLD   1;
自动拦截(Ban IP)
是否开启自动拦截
### If "Y", enable automated IDS response (auto manages
### firewall rulesets).
ENABLE_AUTO_IDS             Y;
根据危害等级,自动拦截
达到一定的危害等级,才自动拦截,默认是5
### Block all traffic from offending IP if danger
### level >= to this value
AUTO_IDS_DANGER_LEVEL       5;
自动拦截解封时间
IP 虽然被关进小黑屋了,但过段时间还是可以出来的。默认关小黑屋 1 小时,你也可以多关一会儿。
### Set the auto-blocked timeout in seconds (the default
### is one hour).
AUTO_BLOCK_TIMEOUT          3600;
忽略特定端口
为了配合其他程序使用,你可以设置几个忽略的端口。端口格式:{协议}/{端口名}
### define a set of ports to ignore (this is useful particularly
### for port knocking applications since the knock sequence will
### look to psad like a scan).  This variable may be defined as
### a comma-separated list of port numbers or port ranges and
### corresponding protocol,  For example, to have psad ignore all
### tcp in the range 61000-61356 and udp ports 53 and 5000, use:
### IGNORE_PORTS        tcp/61000-61356, udp/53, udp/5000;
IGNORE_PORTS                NONE;
例如默认的设置就是,当危险等级达到 5 级时,把此 IP 关小黑屋 3600 秒。
禁用邮件警告
PSAD 每天都会收到很多报警邮件,根据你设置的阈值不同,有时甚至会收到几百份,撑爆你的邮箱,因此你或许会希望关闭邮件报警功能。
找到 ALERTING_METHODS 并设置为 noemail 即可。
	### Allow reporting methods to be enabled/restricted.  This keyword can
	### accept values of "nosyslog" (don't write any messages to syslog),
	### "noemail" (don't send any email messages), or "ALL" (to generate both
	### syslog and email messages).  "ALL" is the default.  Both "nosyslog"
	### and "noemail" can be combined with a comma to disable all logging
	### and alerting.

	ALERTING_METHODS            noemail;
指定日志路径
默认情况下 PSAD 并不会监控 /var/log/syslog 所以需要手工指定。
搜索 IPT_SYSLOG_FILE,并将其值改为系统日志所在的路径,例如 Ubuntu 的路径为:/var/log/syslog
IPT_SYSLOG_FILE = /var/log/syslog;
添加 IP 白名单
如果你每次登录 shell 的电脑是固定 IP,那么你可以把自己的 IP 放进白名单,永远不会被 PSAD 封禁。
sudo vi /etc/psad/auto_dl
	#  <IP address>  <danger level>  <optional protocol>/<optional ports>;
	#
	# Examples:
	#
	#  10.111.21.23    5;          # Very bad IP.
	#  127.0.0.1       0;          # Ignore this IP.
	#  10.10.1.0/24    0;          # Ignore traffic from this entire class C.
	#  192.168.10.4    3    tcp;   # Assign danger level 3 if protocol is tcp.
	#  10.10.1.0/24    3    tcp/1-1024;  # Danger level 3 for tcp port range

	8.6.253.50   0;
根据之前设置的级别,对应此处的 5 种等级,白名单是 0,黑名单是 5,你可以把自己 IP 设置成 0.
改好以后保存退出,重启 psad 服务:
$ sudo service psad restart
现在你可以用另外一台电脑扫描端口来测试效果,注意不能跟你一个局域网,最好请外地的朋友帮忙。
欢迎转载,但请勿用于任何商业用途,谢谢你!请标注以下信息『 原文出处:怎样用 PSAD 摆脱服务器端口被扫描 - 张林海博客 http://zhanglinhai.com/archives/416 』